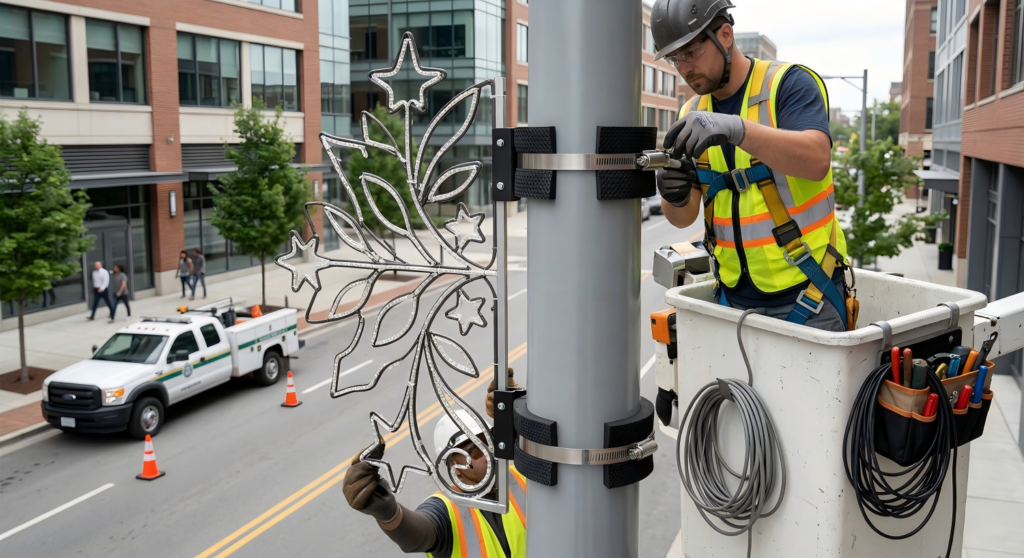
How to Install Pole Mounted Street Motif Lights Without Damaging the Pole
Pole mounted street motif lights are widely used in seasonal streetscapes, festival routes, shopping districts, and public lighting programs because they create strong visual impact without taking up ground space. In many projects, however, the real concern is not the motif itself but the installation method: how can a decorative frame be fixed securely to a street pole without drilling, cutting, or weakening the structure?
The safest starting point is to treat the pole as protected infrastructure rather than as a surface to modify. Street light poles are engineered for lighting loads, wind exposure, cable routing, and long-term maintenance. Any installation method that punctures the pole, removes its protective finish, creates sharp contact points, or concentrates force in a very small area can increase the risk of corrosion, surface damage, and future maintenance issues.
For that reason, most professional projects begin with no-drill mounting methods. If you want to see a related product application example, you can also review this pole mounted street motif lights product page. For a more general installation reference already published on the site, see this installation guide on pole mounted street motif lights.

1. Start with a Pole Assessment
Before selecting brackets, straps, or clamps, assess the actual pole on site. Installation decisions should be based on field conditions rather than assumptions from a catalog or a previous project. Record the pole shape, diameter or width, surface finish, taper, installation height, nearby lamps or arms, and the direction of the strongest expected wind.
Some round poles become narrower higher up, while square or decorative poles may include trim details, flanges, or ornamental sleeves that reduce the usable mounting area. These small differences can affect bracket fit, load balance, and long-term stability.
2. Use No-Drill Mounting as the Default Method
For most projects, no-drill mounting should be the default choice. Common solutions include stainless steel banding straps, U-bolt bracket systems with back plates, padded clamp assemblies, and custom saddle brackets shaped to match the pole profile.
These systems are designed to secure the motif through compression and restraint rather than penetration. That makes seasonal installation and removal easier while also reducing the risk of damage to the pole coating.
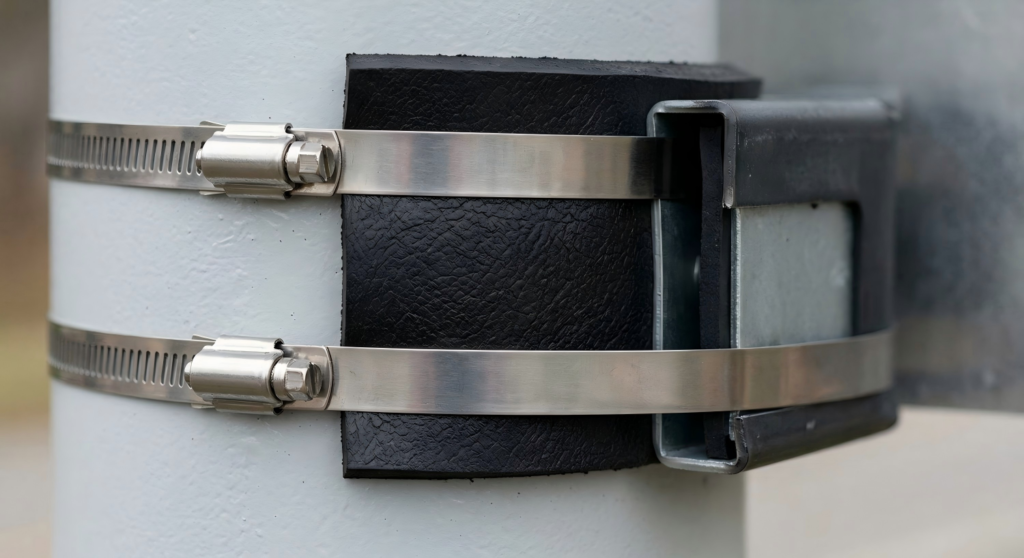
3. Protect the Pole Surface at Every Contact Point
Many cases of pole damage do not happen because the motif is too heavy, but because the contact points are poorly designed. Bare metal pressed directly against a painted, powder-coated, or galvanized pole can scratch the surface during tightening or under repeated wind movement.
To reduce this risk, use rubber pads, polymer liners, neoprene strips, or shaped isolation blocks between the hardware and the pole. These materials help prevent direct metal-to-metal abrasion and can improve grip at the same time. The goal is not only to avoid visible scratches on installation day, but also to prevent slow wear over the full outdoor service period.
4. Match the Bracket Layout to the Pole
A common field mistake is trying to force a standard frame onto a pole that does not match the original hardware layout. When installers do this, they often over-tighten one side, improvise spacers, or bend attachment points in order to make the frame fit. These shortcuts can create uneven loading and concentrated surface pressure.
A better practice is to adapt the bracket layout to the measured pole size and geometry before installation begins. When the mounting geometry fits the actual pole, installation becomes faster, cleaner, and more repeatable.
5. Control Wind Load and Movement
Weight matters, but wind pressure and leverage matter just as much. A motif light with a wide face or decorative extensions may create more turning force on the mounting system than its weight alone suggests. The farther the frame projects from the pole, the greater the leverage under wind load.
To reduce stress, keep the motif as close to the pole as practical without crushing the light strings or making maintenance difficult. Use two-point or multi-point attachment whenever possible so that the frame cannot rotate. Larger motifs may also require a secondary restraint cable, a stabilizing lower point, or an anti-sway support arm.
6. Route Cables Carefully
Improper cable routing can also damage the installation over time. Power cables should not be trapped under sharp bracket edges, dragged across rough surfaces, or left loose where they can rub against the pole in windy conditions.
Where cables pass over metal components, use edge protection or similar isolation. Keep cable runs neat, secure, and easy to inspect. Good cable management improves safety and also makes future maintenance easier.
7. Tighten in Stages
Another avoidable cause of pole damage is uneven tightening. If one side of a bracket is fully tightened before the opposite side is seated correctly, the hardware can twist and drag across the pole surface, concentrating force in one small area.
A staged tightening sequence is safer. First, position and support the frame. Second, apply light and even tension to all fixing points. Third, check alignment, clearance, and verticality. Only then should final tightening be applied gradually and symmetrically.
8. Inspect After Installation
A professional installation is not finished when the lights turn on. After mounting, inspect the system for frame movement, strap slack, pad displacement, cable pinch points, scratches, and bracket edges that sit too aggressively against the pole.
It is also wise to inspect again after several days of operation or after the first period of strong wind. Minor settling can happen as pads compress and hardware seats fully. End-of-season removal is also a useful time to check whether the chosen mounting method left marks or created wear patterns that should be improved next time.
9. Common Mistakes That Damage Street Poles
Most pole damage comes from a few repeated mistakes: drilling without approval, using bare steel clamps directly against the finish, over-tightening narrow brackets, selecting hardware without actual measurements, allowing the motif to sway in wind, and routing cables where they rub continuously against metal edges.
Another common mistake is assuming that all poles on the same street are identical. In real projects, replacement poles, different coatings, and varying fixture heights can create important differences from one location to another.
Conclusion
Installing pole mounted street motif lights without damaging the pole is not complicated, but it does require discipline. Measure the real pole, use no-drill hardware whenever possible, protect every contact point, control movement, route cables carefully, and inspect after installation.
When these basics are handled properly, decorative lighting can improve public streetscapes while preserving the infrastructure that supports the display.
FAQ
Do pole mounted street motif lights usually require drilling into the pole?
In most seasonal street decoration projects, drilling is not necessary. No-drill mounting methods such as stainless steel straps, clamp systems, and padded brackets are usually preferred because they reduce the risk of damaging the pole surface and make seasonal removal easier.
What is the safest way to avoid scratching a painted light pole?
The safest method is to isolate every major contact point between the mounting hardware and the pole surface. Rubber pads, neoprene strips, or other protective liners can help reduce abrasion, improve grip, and prevent coating damage during tightening and outdoor use.
Why is measuring the pole before installation so important?
Because bracket mismatch is one of the most common on-site problems. A mounting system that does not match the pole diameter, shape, or taper can lead to uneven pressure, instability, surface wear, and difficult installation adjustments.
Can wind cause damage even if the motif light is lightweight?
Yes. A lightweight motif can still create significant turning force if it has a large face area or projects too far from the pole. Wind pressure, sway, and repeated vibration can loosen hardware and wear down protective finishes over time.